
Graduation season is just around the corner. Which means the kids are itching to finish school and start that party planning. While graduation is a huge milestone, it doesn’t mean the party should break the bank.
In the spirit of saving a few dollars, let’s chat about how easy it is to make DIY water bottle labels. These make great decorations and also party favors. I’m going to show you how to make a graduation theme label, but really these can be made for any occasion.
To start off, pick up a case or two of your favorite brand of water. And yes, it’s okay to have a favorite brand because they do all taste different. Carefully peel off a label from one of the bottles so it can be used for measurements. The rest of them can be ripped off in haste.
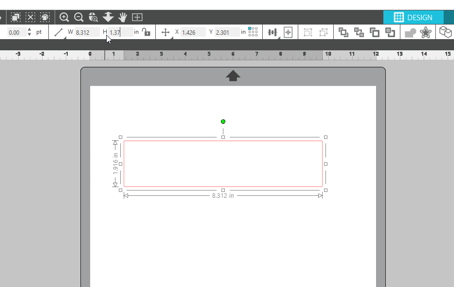
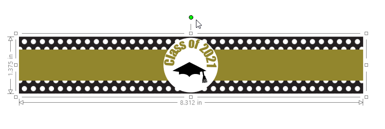
Measure the length and width of the wrapper. I’m using an arrowhead water bottle and my label is 8.312 inches long and 1.375 inches tall. In Silhouette Studio, make a rectangle that is the size of the wrapper.
I wanted to dress up the wrapper so I added a circle to the center which will be the focal point of the design. I made it slightly smaller than the width of the rectangle. To make this a graduation theme I added the words “Class of 2021” and I curved it to the path of the circle by double-clicking on the text. Then a white circle with 4 arrows appears next to the text. This button allows the text to move left and right in the circle. The slider also appears to is to move the letters up and down in the circle.
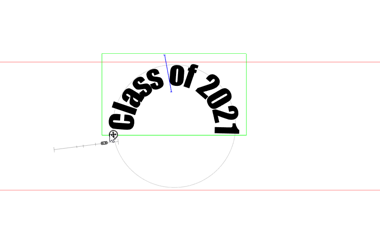
Once the text is in a good place select it, right-click the mouse, and select convert to path. This will keep the arch in the text even when it is moved out of the circle.
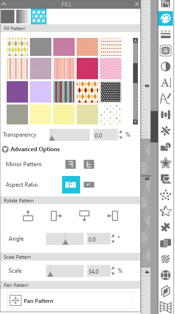
The design is a bit plain so over in the fill panel, check out all the fun fill patterns. These are used just like digital papers. Select the rectangle and choose a pattern and it will fill the shape with the pattern. I chose the black and white polka dots. At first, the circles were too large so I clicked on the scale slider to adjust the size of the dots.
Now with the black text and black pattern, the design is looking a bit dark. I filled in the circle with gold and added a gold rectangle strip to break up the pattern. I also added my graduation cap svg cut file to the circle to drive home the graduation theme.
With the bottle label looking good it is time to think about the materials. There are a few different options on how to make these. If you are planning to keep these bottles on ice, I suggest you waterproof the labels. This means either covering your printer paper with a sheet of clear vinyl or purchasing some waterproof sticker paper. I’m using some non-waterproof sticker paper so I’ve opted to cover my labels with clear vinyl to add some extra protection.
Since I’m adding a layer of vinyl, I’m adding an offset to my design. In the video, I placed the vinyl on the sticker paper and cut along the offset. This left sticker paper behind the offset, so if you just want a bit of a border around your design you can do it this way.

How this should really be done to seal in the non-waterproof paper is to create the offset and set it aside for a separate cut. Print and cut the labels like normal without the offset. Once those are done put a sheet of the clear vinyl into the cutting machine and cut copies of the offset only. This will give you a clear border to seal in the design.
Carefully align the label with the clear vinyl wrapper and stick them together. Now take your time to apply this to the water bottle. Be sure to keep the wrapper within the flattened area on the water bottle.
This project does take a bit of time, but the outcome is totally worth it. I love how easy it is to design custom water bottle labels. You can even put everyone’s name right on the wrapper! Definitely a party favor to remember.
For the full tutorial check out the video below. I also talk about cutting the vinyl separate from the labels.


