
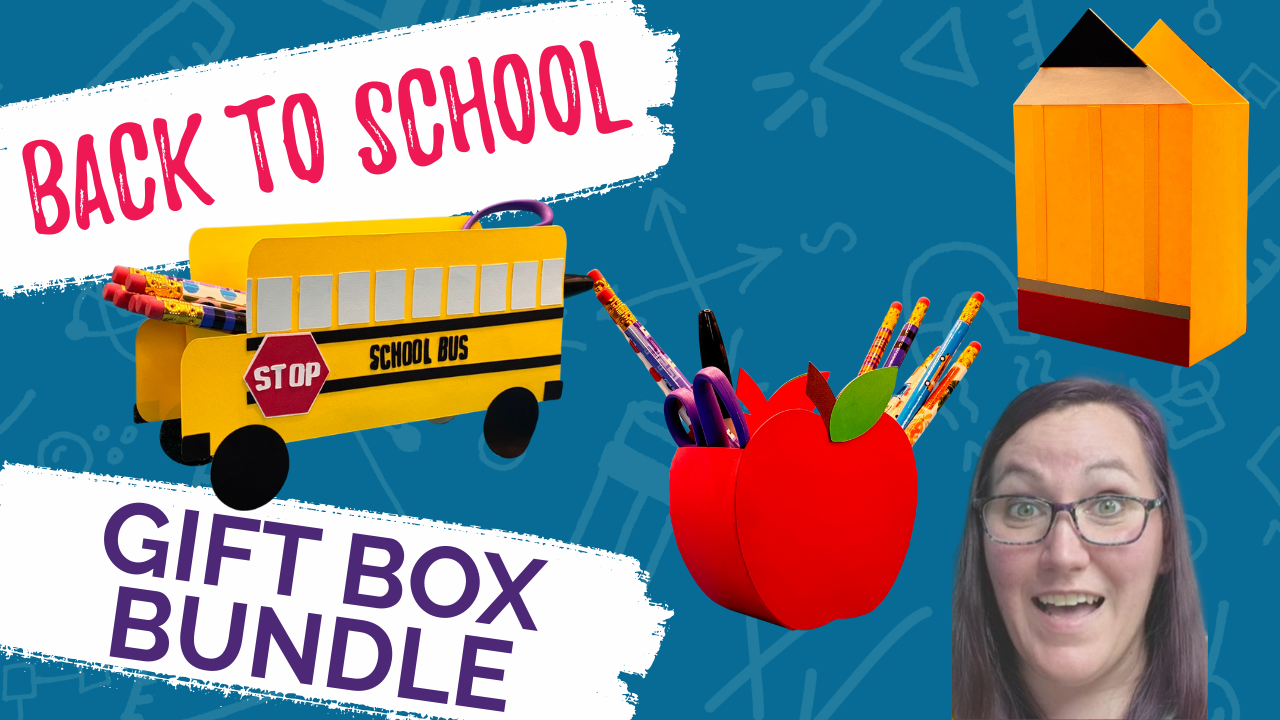
Ready to make this back-to-school season extra special? These adorable DIY treat boxes are about to become your new favorite craft project!
Back-to-school season always gets me excited about fresh starts and new possibilities. And honestly? There’s something magical about creating handmade gifts that show you care. Today I’m sharing my back to school treat box bundle that’s been a total hit with teachers, parents, and kids alike!
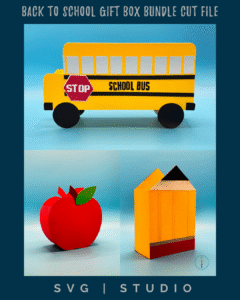
What You’ll Make: 3 Adorable School-Themed Treat Boxes
This bundle includes three distinct designs that are perfect for the classroom:
- Apple treat box – Classic teacher appreciation vibes
- Pencil treat box – Perfect for holding school supplies
- School bus treat box – Fun and nostalgic with detailed paper piecing
Each box has plenty of room inside for treats, school supplies, or small gifts. I love how versatile these are – you can customize them with names, messages like “Welcome Back,” or even your teacher’s name for a personal touch.
Perfect Uses for Your DIY School Treat Boxes
The beauty of these handmade school crafts is their versatility! Here are some of my favorite ways to use them:
For Teachers:
- Teacher appreciation gifts filled with candy or gift cards
- Classroom supplies organizers for pens, markers, and erasers
- Welcome back gifts for new students
- End-of-year thank you presents
For Students:
- First day of school surprise treats
- Classroom party favor containers
- Desktop organizers for school supplies
- Personalized storage for weeding tools (yes, I tested this!)
For Parents:
- Back to school countdown activities
- Lunch box surprises
- Homework reward containers
- Sibling gifts when one starts school
Materials You’ll Need for Success
Back to School Gift Box Bundle
Recollections Cardstock Pack
Astrobrights Cardstock Pack
Rose Gold Foil Cardstock
Liquid Glue
Cutting Machine
Electrostatic Mat
Color Combinations That Work:
- Traditional: Bright reds, school bus yellow, apple green
- Modern: Soft pastels with white accents
- Neutral: Kraft paper with colored accents
Starting with the Apple Box
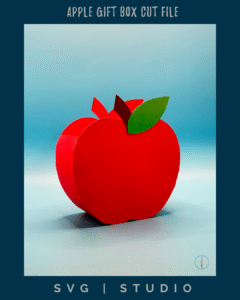
The apple is probably the most recognizable school symbol, right? Here’s how we tackle this curved beauty:
Paper Piecing the Details:
- Begin with the decorative panels – these will cover any messy glue work later
- Attach the stem pieces flush with the top edge (remember, they’ll mirror when attached)
- Add the leaf, matching the long pointed end to create symmetry
- Take your time – liquid glue gives you wiggle room to adjust!
Assembling the 3D Shape: The secret to a smooth apple curve is working with small sections of glue tabs at a time. I like to do just 3-4 tabs, then use my table as a work surface to press the seams properly. This prevents those frustrating gaps that let light through.
Pro tip: Train your cardstock to curve by running a marker along it, just like you would with ribbon curling!
Creating the Pencil Box
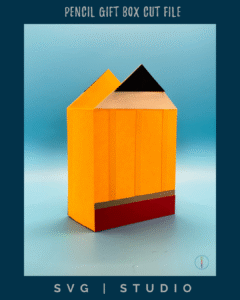
This DIY pencil craft has the most layers, but don’t let that intimidate you! The key is decorating first, then assembling:
Layering the Details:
- Start with the yellow strips that represent the pencil wood
- Add the triangular pieces for the sharpened tip
- Include that shiny foil strip for the metal ferrule (fancy word for that little band!)
- Finish with the pink eraser
The pencil box has two compartments, making it extra functional for school supply storage.
Building the School Bus Box
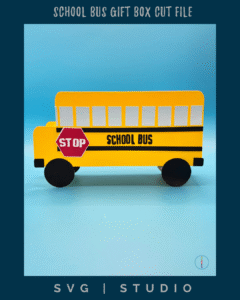
Okay, I’ll be honest – this one has the most paper piecing, but the result is absolutely worth it!
Windows and Details:
- Cut windows from light blue cardstock for that glass reflection effect
- The door windows are longer rectangles
- Don’t forget the tiny stop sign pieces (though I’ll admit, double-sided tape was NOT my friend here!)
Note: If all those tiny pieces feel overwhelming, consider setting this up as a print-and-cut project instead.
Troubleshooting Common Assembly Challenges
Gaps in Your Curved Seams? This happens when you try to glue too many tabs at once. Pull each tab individually with your fingernail to close those gaps – you’ve got this!
Pieces Not Lining Up? Double-check your fold directions. All score lines should fold away from you consistently.
Struggling with Tiny Pieces? A pick-me-up tool is your best friend for detailed paper piecing. Or switch to small glue dots instead of double-sided tape.
Making These Boxes Your Own
Personalization Ideas:
- Names instead of generic text
- Class photos as decorative elements
- School colors to match your district
- Metallic accents for extra special occasions
Size Modifications:
These boxes are designed to hold standard treats and supplies, but you can easily scale them up or down depending on your needs.
Why Handmade Back-to-School Crafts Matter
There’s something special about putting time and creativity into gifts for teachers and students. These aren’t just containers – they’re little reminders that someone cared enough to make something by hand. In our digital world, that personal touch means everything.
Plus, let’s be real – teachers deserve all the appreciation we can give them! A handmade treat box filled with their favorite candies or a gift card shows gratitude in a way that store-bought gifts just can’t match.
Ready to Start Crafting?
These DIY school treat boxes are perfect for crafters of all skill levels. Yes, there are some detailed steps, but I’ve broken everything down so you can take your time and create something beautiful.
The apple box is great for beginners, while the school bus offers a fun challenge for more experienced crafters. And that pencil? It’s the perfect middle ground!
Check out the video below for a full assembly tutorial.


