how to make mandalas in silhouette studio

Please note: this post may contain affiliate links to products I use. When you purchase items from these links, I make a small commission that helps fund craft projects I share with you. This does NOT cost you anything extra, but it is a great way to show your appreciation for Crafty Christie’s Creations.

How to Create Mandalas in Silhouette Studio

Mandala designs have become pretty popular lately. Did you know that mandalas have been around for a really long time? According to Encyclopedia Britannica, the word mandala means circle in Sanskrit. Mandalas have been used in Hindu cultures for centuries to aid with meditation. With that in mind, I thought it would be fitting to share how to create mandalas in Silhouette Studio.
 
Mandalas have definitely been a form of meditation for me. In the past few weeks, I’ve been lacking in the creativity department. I found myself walking into my craft room and sitting at my table unable to make anything. The depression stage of social distancing has kicked in.
 
I attempted to work on my drawing skills and ended up making more mandala designs. There is something calming about creating them. All my worries are washed away with each new layer added to the design. Let’s dive into creating.
 
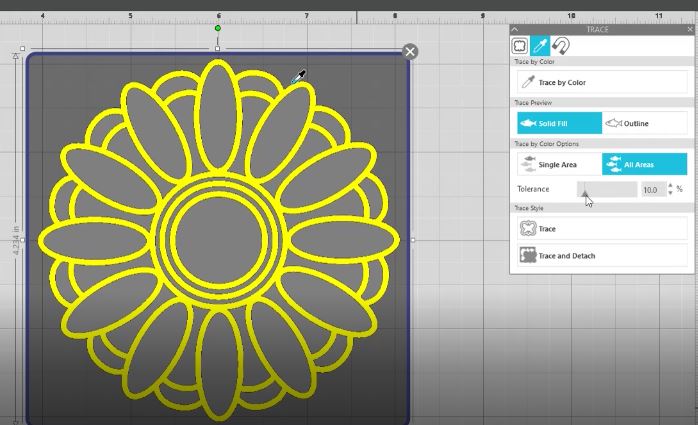
Designer’s edition or higher is needed to be able to trace by color and adjust the center of rotation.
 

Step 1: Prepare the Artboard

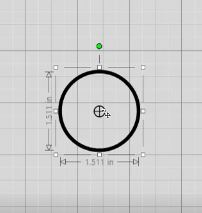
Start by turning on the grid lines. These are critical for getting the design symmetrical. Next, set the outline to 5 points or more if you want to cut this design out of paper. Leave the fill color as none for now.
 

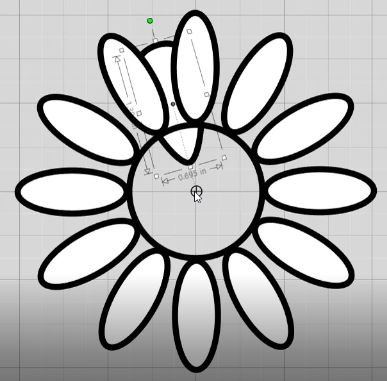
Step 2: Drawing the Mandala Center

Grab the ellipse tool and draw a perfect circle by holding down the shift key while drawing. Be sure to click off with the mouse before letting go of shift so the circle doesn’t warp.
 
In the settings tab, turn on the center of rotation. This is a circle with a + in it. Line up the center of rotation of the circle with the crosshairs on the graph.
 
center of rotation
Choose a fill color and draw the next shape. Use the ellipse tool to draw a petal shape. Place the pedal with one end touching the circle. Click and drag the pedal’s center of rotation to be in the center of the circle.
 
drawing s petal for the circle

Step 3: Replicate

Go to the replicate panel, choose the one with the + symbol. Choose to make 1 copy and pick the degree of rotation that fits the look you want. I usually like my first pedals to be touching on the edges but not overlapping. Once you have the correct degree chosen keep hitting replicate until the pedals go all the way around the circle.
using the replicate panel

Step 4: Add the next layer

It is time to add your next element. Grab the ellipse tool again and draw another oval. From here you can double click the oval to get the point editing. You’ll be able to use the blue handlebars to manipulate the shape. I turned mine into more of a teardrop shape.
 
use point editing to change the shape
Place the shape above the pedal shape. Send the teardrop to the back so you can see the other layers. Adjust it to your liking and then move the center of rotation and replicate this design around the circle as well. Keep adding more layers and sending them to the back of the design.
use the send to back command to place the shape behind the flower

Step 5: Trace

Once you have the mandala completely built out, its time to trace. Fill in the center circle with color to match the rest. Group the design together so the pieces move as one. Select trace by color. Click on the eyedropper and select the outline of the mandala. Check the solid fill and all areas. Adjust the trace box as needed to fit the entire design within its box. Then click trace.
trace the mandala
Now your mandala design is ready for cutting!
cut ready version of the mandala
Try it out for yourself and see if you become addicted to mandalas like me! If you do make some please post a photo on social media and tag me @craftychristiescreations. I’d love to see what you’ve come up with.
 
Here is the video tutorial for all my visual learners 🙂
Picture of Crafty Christie

Crafty Christie

Silhouette Tutorialsist and SVG Designer

Hi! I'm Christie!

I am passionate about helping other crafters unlock their creativity and take their crafting skills to the next level.

Let's Connect!

Blog Categories

Design Faster with Silhouette Keyboard Shortcuts