
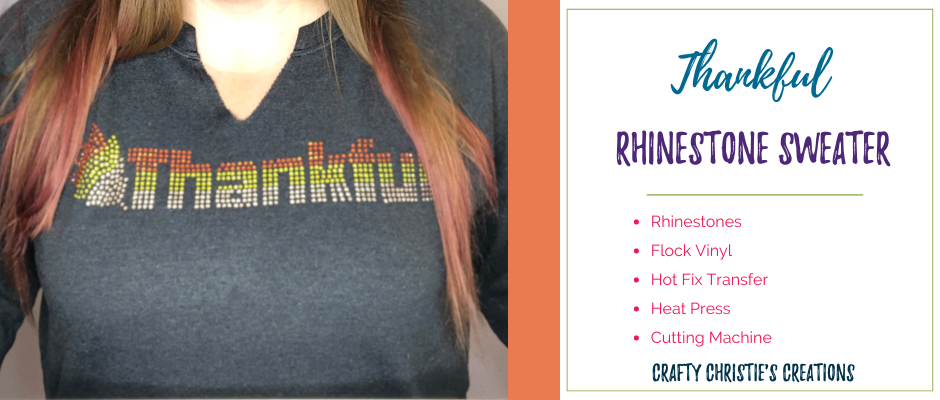
So you want to add some bling to your favorite sweater? This is the place to learn how to make a DIY sweater with your Silhouette cutting machine. Once you’ve made the template, adding the rhinestones is pretty simple. Follow along and I’ll show you all the steps involved to add rhinestones to your clothing.
Supplies:
Step 1: Cutting the template
Either purchase a rhinestone template svg or make your own in Silhouette Studio. You will need Designer’s Edition or higher to have access to the rhinestone panel. Check out this blog post where I go over how to make a rhinestone template in Silhouette Studio.
The stencil is cut out of the magic flock vinyl. Be sure to cut each layer from the same size piece of flock. This allows you to lay each layer on top so they match up. Think of this as your registration mark.
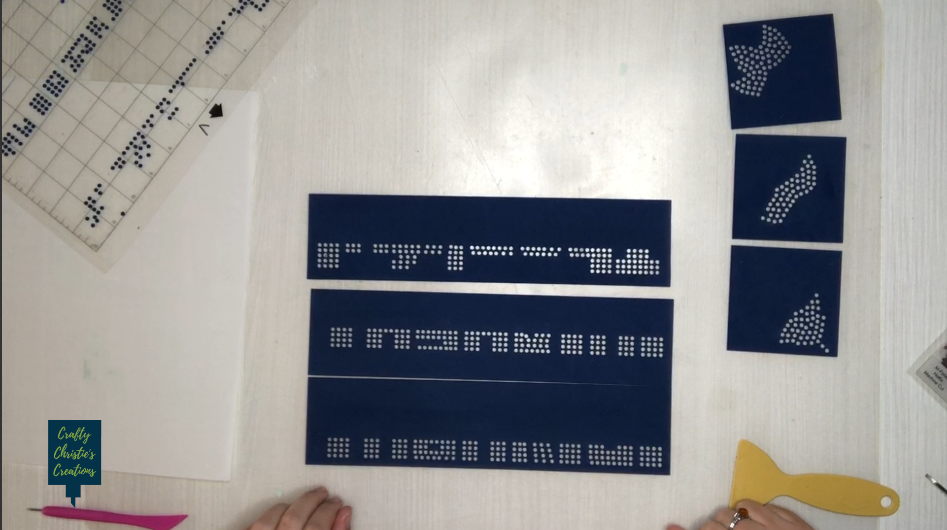
I had to do a lot of test cutting before I found settings that worked. I started with the default settings that Silhouette provides and ended with rachet blade 10, force 33, speed 2, and 2 passes. I also found that it works much easier if you take the white backing paper off and stick the flock directly to the mat. The stickiness on the flock didn’t cause any problems with my mat.
I also found if I burnished the vinyl down really well before removing it from the mat and pulling slowly, I was able to get most of the circles to stay on the mat.
Side note on the magic flock- while the material may seem expensive, it is reusable which is great if you plan on making more than 1 of your design.
Step 2: Brush in the rhinestones
I’m using 10ss (3mm) hotfix rhinestones, they have glue on the back that is heat activated. If you plan on using rhinestones for clothing this is what you want. There are lots of different sizes of rhinestones so depending on the look you want you can get larger or smaller hotfix stones.
Apply your template to a smooth, flat surface like a tabletop or craft mat. This is super important so the rhinestones can easily fall into the holes in the template.
Pour out a small mound of stones and using some sort of sponge or squeegee, brush the stones over the openings. The stones should fall right in, I was able to use a pair of tweezers to fill in any remaining holes.
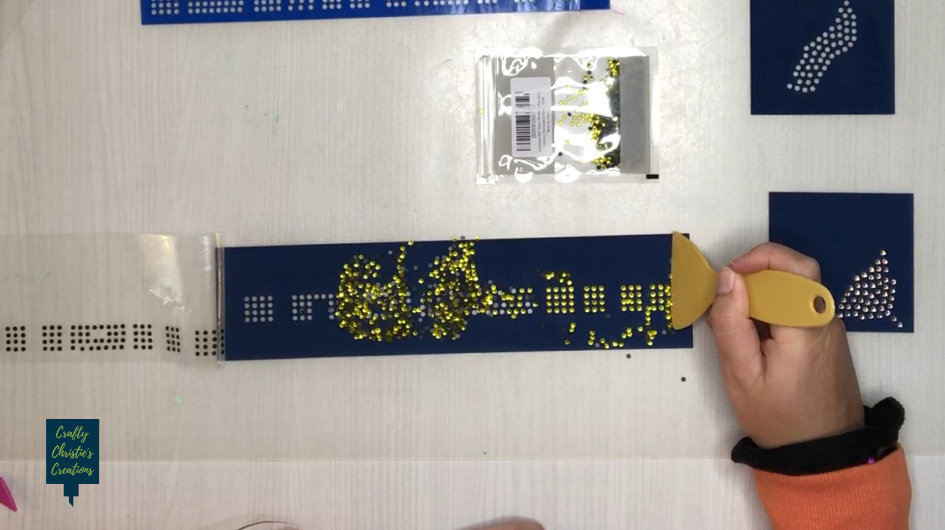
Word of advice- Before using the transfer tape, get all the extra stones cleared off the vinyl and out of your work area.
Step 3: Make your transfer
Using the hotfix transfer film, cut an area larger than your template. Learn from my mistakes, and leave some extra length on one side so you can hinge your transfer when adding layers.
While this transfer film is also reusable, you do only get 1 shot at pulling up the stones. I goofed and had to pull all the stones off the transfer and re-brush the stones into the template. I did notice the transfer didn’t grab some of the rhinestones as well the 2nd go around.
If you’re doing more than one color, pull that transfer far enough over that you can layer your next piece of the flock template on top of the last template. Trust me this makes a huge difference in getting all the stones lined up and evenly spaced. Even though my design was mostly block letters that I could eyeball, using the hinge method saved me lots of time and headaches.

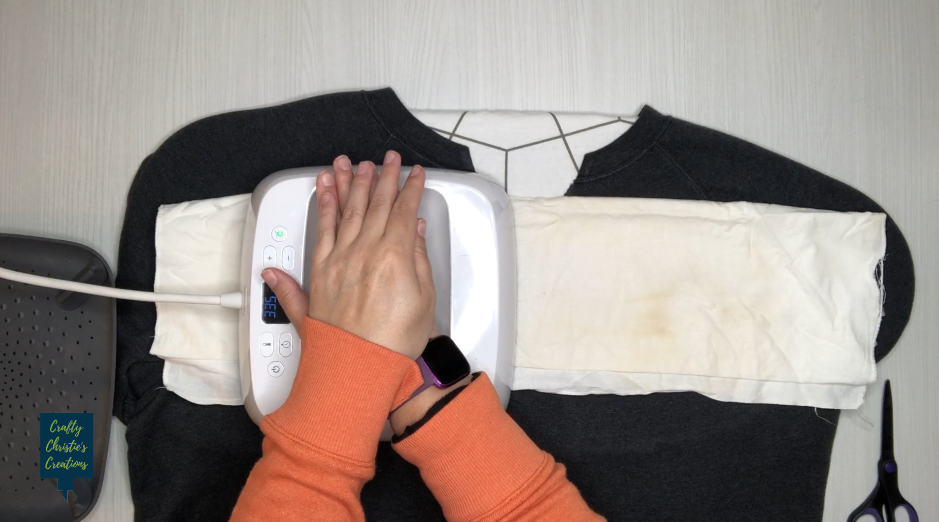
Step 4: Add the heat
This step is the same technique as using heat transfer vinyl. The hotfix transfer tape is used for rhinestones because it is heat protectant. It isn’t as sturdy as the htv transfer sheet, but is just as sticky.
Lint roll and preheat your sweater before applying the decal. I ended up having to apply heat multiple times to my shirt. On my last try, I removed the protective cloth I put over my transfer film and that seemed to help. I think using a real heat press instead of the easy press might be better for applying even pressure, but I eventually got it done. I used 335 degrees for 15 seconds at a time.
Carefully peel back the transfer, if a rhinestone isn’t stuck down apply more heat. Repeat as needed. When all the rhinestones are stuck, peel the transfer film and run your hand through the inside of the sweater. You’re making sure the glue from the rhinestones didn’t glue the shirt closed.
Step 5: Wear it with pride
For me, this was a great first attempt at rhinestones. I did have a few stones fall off the next day. I think this has to do with me having to keep adding heat. I’ll have to pull out some more stones to patch up the shirt. Overall the 3 color design turned out better than I expected and I can’t wait to bling again!
Check out the video below for more details.


