
Who says you can’t celebrate Christmas in July? If you’re anything like me, you’re already dreaming about your holiday crafting list – and trust me, these adorable 3D stand-up Christmas trees need to be at the very top!
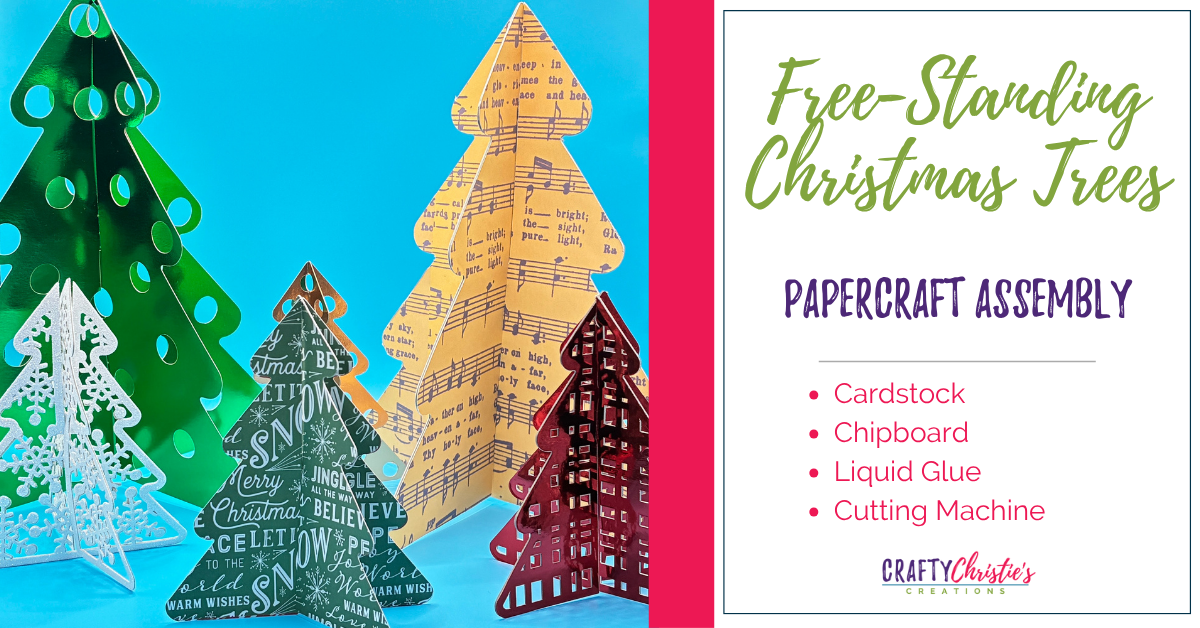
I just finished creating these gorgeous 3D stand-up Christmas trees, and I’m practically bouncing in my craft chair. These beauties are 5 and 10 inches tall, completely dimensional, and here’s the best part – they fold totally flat for storage. (Because let’s be real, we all need more storage solutions in our craft rooms!)
Supplies:
Free Standing Christmas Tree Bundle
Chipboard
Cameo 5
Electrostatic Mat
Sticky Mat
Tape
Liquid Glue
Printer
Why I’m Calling This My “Rule-Breaking” Tutorial
Okay, I have to come clean with you – this tutorial is a little different from my usual step-by-step approach. I’m literally breaking some traditional print-and-cut rules, and I’m not even sorry about it! Sometimes the best results come from coloring outside the lines, right?
When I couldn’t find card stock with a pattern I loved, I decided to create my own digital papers. And let me tell you, that music note pattern I ended up with? Chef’s kiss – it gives these trees such an elegant vintage vibe that I’m obsessed with.
The Magic Behind the Method
Here’s where things get fun (and maybe a tiny bit technical, but stick with me!). I discovered that to make the text read correctly on these angled cuts, I needed to print at specific angles – 15° and 15° rotations. I know it sounds complicated, but I promise I walk you through every single step in the video.
The process involves creating four different printed sheets, and there’s actual strategy behind each one. When you see how perfectly the text lines up in the final product, you’ll understand why we go through all these steps!
My Chipboard Game-Changer Discovery
Can we talk about chipboard for a hot minute? Y’all, adding chipboard backing completely transforms these from cute paper crafts into substantial décor pieces that could easily be sold at a boutique. I tested different materials on the chipboard, and I’ve got some serious insider tips for you:
- Foil HTV on chipboard? Absolutely stunning and super sturdy.
- Glitter HTV on chipboard? Learn from my mistake – it actually makes them flimsy!
These are the kinds of real-world testing results I love sharing with you because nobody has time for projects that don’t work out.
What You’ll Learn in My Full Tutorial
I’m not going to spoil all my secrets here (you know you need to watch the video for the good stuff!), but here’s what I cover:
- How to create custom digital papers using fill patterns
- My angle adjustment tricks that make text read perfectly
- Chipboard cutting settings that actually work
- Assembly techniques that make these look professionally made
- Troubleshooting tips for when cuts don’t align (because it happens to all of us!)
The Bundle That’s Making Me Happy Dance
I created this in both 5-inch and 10-inch sizes with four different designs: plain, polka dots, plaid, and snowflakes. And here’s something super important – you cannot resize these! I designed those slits to be the exact width needed for card stock and thin chipboard. Trust me on this one.
Come Craft With Me!
I had so much fun filming this tutorial, and I can’t wait for you to see all the little techniques and tricks I demonstrate. There’s something magical about watching these flat pieces transform into dimensional art, and I get to share that “aha!” moment with you.


