
Bees are very interesting creatures. It is said that if the bees were to become extinct, so would humans! With that in mind here are a few fun facts about bees for you to think about while creating your layered bee card.
- Only female bees can sting
- The honeybee is the only insect that makes food humans can eat
- Honeybees can fly up to 15 mph
Somewhere along the line we took an insect and turned it into something cute and playful. So for your bee-loving friends out there, here is a wonderful card they are sure to enjoy.
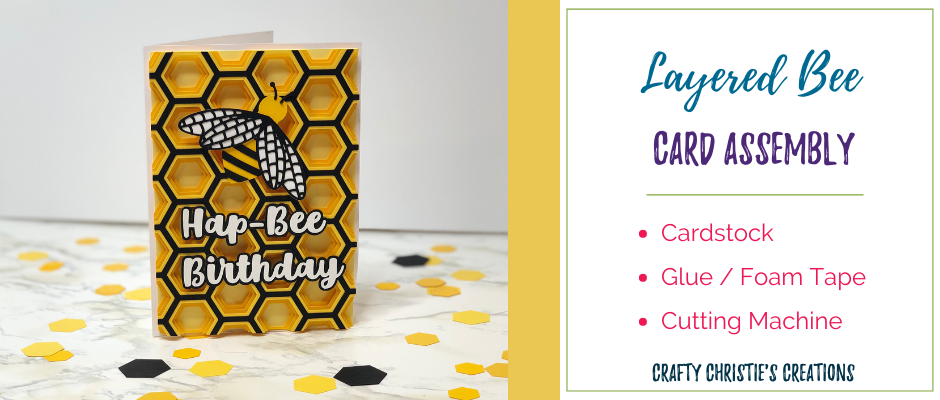
Card Information:
This is a 5×7 inch card with 4 layers of honeycomb on the front. Plus the bee and text also have a few layers. “Bee” prepared to add some extra postage when mailing.
This card is for intermediate-level card makers. If you are a beginner card maker I suggest trying my Happy Birthday Card.
Supplies:
Foam Tape
Step 1: Cut the Layers
On your Silhouette or Cricut, cut each layer of paper. Cutting the wings and words are the most intricate parts of this project. If you need help with paper cutting check out this post- Cutting Troubles.
*If you save all the hexagons from cutting the honeycomb layers, you can make a bonus card. Layer up the hexagons and leave a little space between each one when you add it to your card base. Cut another sentiment and Bee and now you have a reverse card. If you want the spacing to be exact, use the thinnest honeycomb layer as a stencil to place the hexagons on your card base.
Step 2: Assemble the Bee
There are scorelines across the belly of the bee to indicate where the stripes should be placed. There are also scorelines to indicate the placement of the antennas and the wings. I used a foam square to attach the 2 layers of the wings for more dimension.
Step 3: Assemble the Words
This card comes with sentiments “Bee Happy” and “Hap-Bee Birthday.” Both of these have 2 layers so the text can stand out against the honeycomb background. The smaller layer will fit centered in the shadow layer. These I glued down flat.
Step 4: Layer the Honeycomb
Use foam tape to put the layers together for added dimension and shadows. All the edges will align flush. Each smaller layer will sit center on top of the thicker layer. This is the part that takes the longest.
Step 5: Assemble the Card
The last layer of the honeycomb is a sold rectangle. Adhere this to the front of the card base. There should be a thin border that goes all the way around. Add the rest of the honeycomb shapes to this rectangle. Again center these and all the edges should align flush.
Step 6: Add the Text and Bee
The text and bee can be placed anywhere on the front of the card. I aligned the first letter of my text to sit inside the honeycomb. Add glue only to the parts that will be attached to the honeycomb. It is okay that not every piece of the word or bee is glued down.
Step 7: Complete the Card
Write your message on the inside of the card. Add another bee if you’d like. Once you’ve got it all finished carefully stick it in the envelope. I recommend manipulating the envelope before adding the card. Get the envelope trained to open wide.
Check out the video below for all the details on assembling this Layered Bee Card.


