
I will be the first to admit that I am not an expert when it comes to heat transfer vinyl. I’ve dabbled over the years with it, but it isn’t my first love. I’m sharing my htv fail with you to show you, I too make mistakes. I took another stab at making myself a sweatshirt. I used multiple layers of htv and well, it was a learning experience.
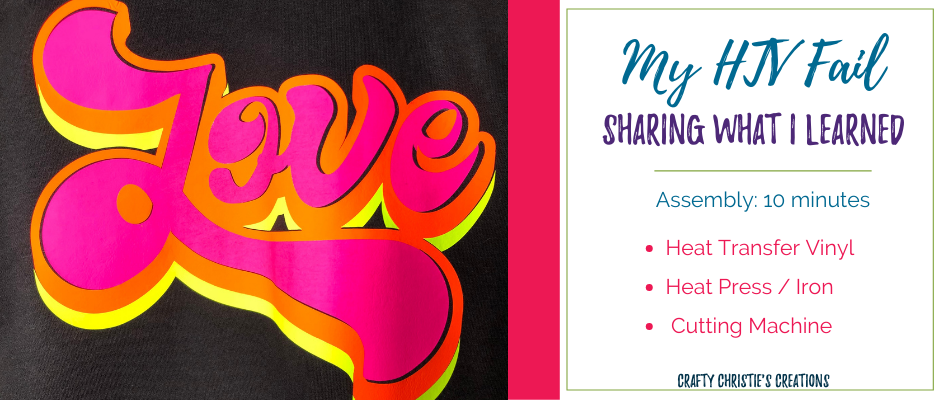
I used my new favorite design: Love – Retro SVG and decided it would look awesome in some neon colors on a black top.
I started off in Silhouette Studio where I mirrored my design to prepare it for cutting on htv. Here is another video where I show this process.
The cutting went spectacular and I was onto weeding in no time. I will say, it is much easier to weed when you leave your vinyl on the mat so it won’t keep curling up. This is one of the problems with storing vinyl in rolls.
Next up, is the fun part, applying it all to the shirt. I started off by measuring down 3 inches from the collar since this is an adult top. I used my fabric pencil to make a line, which I noticed was completely on an angle when I went to edit the video. Anyway, the line is to help with the placement to not be too high or low on the shirt.
In normal Christie fashion, I just decided to wing it, instead of doing my research beforehand! I used everyday iron-on by Cricut and started with 400 degrees F for 30 seconds, based on this being a setting I’ve used in the past for Cricut iron-on glitter htv. I still had to hit each area multiple times to make the vinyl stick to the shirt.
After doing this on the pink layer, I realized my vinyl was looking really thin and the black fabric was showing through in some places. I turned the heat press down to 340 degrees F and continued on with 30 seconds for the next 2 layers.
When I placed my second layer, orange, it wasn’t lining up well at all. I had gaps on some ends when I lined up the other sides. I realized this is because I used too much heat on the first layer and it shrunk.
The third and final layer was a bit better since I had turned down the heat. It still was not completely perfect. After looking at my pitiful project, I figured it was time to do some research to figure out what I did wrong.


